The Problem
You upload a picture online to share your latest adventure with friends, and a few days later you stumble on it on another website signed by a different person. Sad, but it is highly possible these days images are often used and shared without any permission; all you need to do to take a picture off the Web is right-click and save.
Watermark is quickest and simplest way to protect your images
The quickest and simplest way to protect your images is to place a watermark on them, it is not professional photographers’ privilege anymore. Historically, a watermark was a faint design made on some paper during manufacture, visible when held against the light and used typically to identify the maker. Today digital watermarks are text or an image put on top of a photograph or video to identify the ownership.
There are various ways to do it. In this article we shall describe 2 methods you could use to bulk watermark images, i.e. for batch image processing. These are cross-platform solutions, both Windows and Mac users could make use of them.
Two Methods to solve the problem
There are various ways to do it. In this article we shall describe 2 methods you could use to bulk watermark images, i.e. for batch image processing. These are cross-platform solutions, both Windows and Mac users could make use of them.
Easy way to watermark multiple images

PhotoBulk
Requirements: OS X 10.10+, 15.27MB free space, Version 2.6.328 (12 Jan, 2023)
If you process a large number of images, run a blog or a page on a social networking website, you gotta try batch image editor PhotoBulk.
This minimalistic application includes all functionality required for batch image processing. Adding a watermark to hundreds or thousands of images will consume minimal effort.
This minimalistic application includes all functionality required for batch image processing. Adding a watermark to hundreds or thousands of images will consume minimal effort.
Once you download and install PhotoBulk on your computer, do as follows:
1
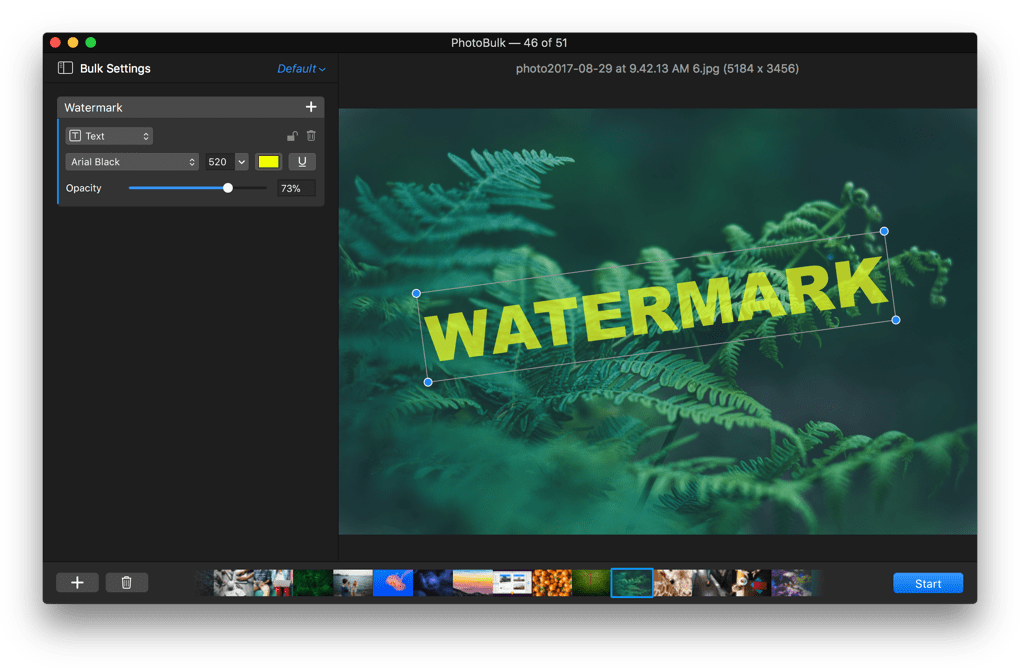
Select pictures to be edited and place them in PhotoBulk window using drag-and-drop. The number of the files will be displayed in the window.
2
At the bottom of PhotoBulk window to the left you will find Watermark button. Click it. You can choose between text, image, script or datestamp watermark and customize it further. Each of them will have their own settings.
3
Clicking Preview button enables you to see the changes you make right away. Press small lock icon on the top of Preview window to resize your watermark proportionally on all your images.
4
Once you are set and done, press START button. A window will be displayed where you can choose a destination folder for the images to be saved and their format. Press Save button.
Flexible Preferences
In watermark settings you can choose a position, set a required angle and transparency. Also you can set the exact size of the watermark and scalability in relation to the image size. Processing a large number of pictures might take a while. Your original pictures remain untouched.
PhotoBulk also enables you to execute other batch operations – resize, optimize, rename and convert them into other format.
Batch watermark photos using Photoshop

Photoshop
License: $240/yrAnother way to add watermarks to a batch of images is to use Adobe Photoshop. Compared to special applications, batch image processing here might require more time & effort.
On the other hand depending on how well you know Photoshop tools you can use various methods to do it. Below we will describe how to watermark photos in Photoshop.
On the other hand depending on how well you know Photoshop tools you can use various methods to do it. Below we will describe how to watermark photos in Photoshop.

How to make a watermark in Photoshop
Open a picture you’d like to watermark and the watermark file. If you do not have a separate watermark file, you’ll need to create one. A text watermark needs to be converted into an image.
Click the watermark and press Ctrl+A to select the entire image, then Ctrl+C to copy it to your clipboard. Now go to the picture to be watermarked and press Ctrl+V to paste the watermark image into it. You might have to adjust the watermark size and position. Before saving changes, make sure to make a copy of the original file.
Batch watermark in Photoshop
Here is how you can watermark multiple images in one go.
- Open an image to watermark. It should be open before we start making any changes, otherwise the app will keep opening this image and watermarking it over and over again.
- In Photoshop go to Windows > Actions.
- Create a new folder by clicking a little folder icon at the bottom of the Actions Palette.
- Then press Create New Action button – it is right next to the New Folder icon we just used.
- Name a new action and assign a function key to it, if required.
- Record button should be pressed by default, but if it is not, press it now to start recording your action. You’ll find it to the left of New Folder icon.
- Now that our action is being recorded go to File >> Place.
- Once the dialog box is displayed, go to your previously created watermark file.
- Click Place button.
- By default the watermark will be placed in the dead center, change the position if required and press Enter.
- Go to File >> Save As. Choose a destination folder for your watermarked images to be saved, press Save. Do not change the file name, otherwise when you play the batch, the app will give all of them the same name and they will be replaced by each other.
- Close the image we just watermarked.
- Do not save image when prompted.
- Press Stop Recording on the Actions Palette.
- Our Action is now recorded.
- To process an entire batch of images we go to File >> Automate >> Batch.
- Select the folder with images.
- Select the folder where you would like to save your watermarked images.
- Press OK and Photoshop will start watermarking all the Images in the selected folder.
This method has certain drawbacks:
First, you can’t just drag-and-drop images to the app’s window. You’ll have to put them in a folder first.
Second, your watermark will not be resized proportionally to your image size
Third, the process is quite resource-consuming so most probably you will not be able to use your computer while the processing is going on.


PhotoBulk
This Batch Image Editor for Mac is fully compatible with macOS 10.10 and later.
Requires 15.27MB free space, latest version 2.6.328. Released 12 Jan, 2023.
4.6 rank based on 334+ users, Reviews (151)