Cookie
Electronic Team, Inc. uses cookies to personalize your experience on our website. By continuing to use this site, you agree to our cookie policy. Click here to learn more.

How to Use a Serial Port in VMware Virtual Machines

Olga Weis Olga Weis Apr 8, 2024

You might need to access serial ports from within a VMware virtual machine either for configuration, logging communication, or debugging purposes. It’s easy to add new serial ports, both physical and remote, in VMware Workstation Pro as long as you meet the prerequisites.
VMware logo

However, accessing them for later use within the virtual environment is another matter. And that’s where the Serial Port Redirection tool comes into the picture.

In this post, we’ll show you how to add a serial port in VMware virtual machines, explain the different connection types, and demonstrate how to access it in a VM. Adding a Serial Port to a Virtual Machine.

Configuring Serial Ports in a VMware Workstation

Adding a serial port (or COM port) to a virtual machine (VM) allows you to interact with serial devices like routers or development boards within the VM environment. There are many ways you can connect a virtual serial port, including connecting to a physical port, file, named pipe, and network.

Virtual machines can have a maximum of 32 COM ports. However, when creating a VM, you can actually choose not to include any at all. If you choose that approach, the guest operating system (the OS running inside the VM) simply won't see any available serial ports.

Requirements

Before adding a virtual serial port, ensure that your virtual machine is turned off already.

Make sure that you’re aware of the right media types and vSPC connection details relevant to your port configuration. You also need to grant a “Virtual Machine .Configuration.Add or Remove Device” privilege to continue.

Specific connection types have unique prerequisites, too. For example, the following firewall rule sets are needed if you want to use your serial port over a network:

  1. VM serial port connected to vSPC. Enable the “Use virtual serial port concentrator” option to facilitate only outbound signals from the host computer.
  2. VM serial port connected over network. This is basically the same as the first rule set, except that it doesn’t use the virtual serial port concentrator (vSPC).

With that established, here’s how you configure a VMware virtual serial port.
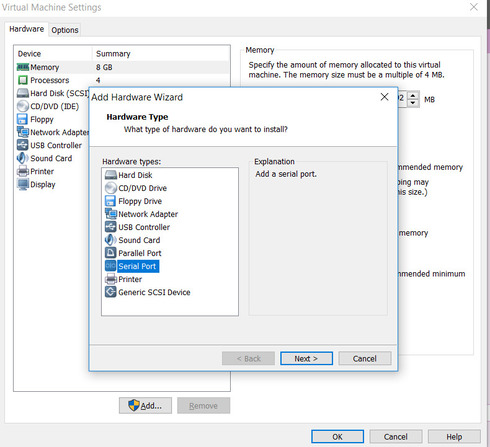
Adding a VMware Virtual Serial Port

  1. In the inventory, right-click your chosen virtual machine and select “Edit Settings”. Switch to the “Hardware” tab and click “Add”.
  2. Expand the drop-down menu and choose “Serial Port”. A new serial port will appear on your list of devices.
  3. Open the “New Serial port” drop-down menu and choose your preferred connection type (physical port, file, named pipe, or network). Then, click “OK” to finish.
wmvare setting interface

Serial Port Connection Types

Depending on what kind of data processing you want to achieve, you need to select a particular connection type for your virtual serial port. Here’s a quick breakdown of the four different connection methods you can use:

  1. Physical serial port: This is the most common setup, allowing the VM to interact with physical devices like modems.
  2. File on the host computer: Data sent through the virtual port is written to a file on the host computer. This allows you to record information about certain processes running in your VM, which is useful for logging communication.
  3. Host-side named pipe: This creates a direct connection for data exchange between the VM and an application or another VM on the host machine. Think of it as connecting two separate machines with a serial cable, except that they’re on a single computer. It’s a common method used for remote debugging.
  4. Network port or vSPC URI: This uses the virtual serial port concentrator (vSPC) to establish the connection over the network. In other words, you use this mode to communicate between the virtual serial port and a remote device.

Outputting to a Named Pipe

If you selected a named pipe connection in the “New Serial port” drop-down menu, click the “Pipe Name” field and type your preferred name (e.g., “\\.\pipe\namedpipe”).

You can simply use the default name provided if you’re using a Windows host computer. Just make sure that you use the same name on both the server and the client.

Then, from the drop-downs available, choose “Near end” and “Far end” of the pipe.

Server vs Client Mode for Network Connections

If you choose a network connection type, you can also select whether to set up your serial port for a client or server connection.

If you opt for a server connection, you gain control over the virtual machine connected to your serial port. It makes your VM act like a server, waiting for an incoming connection from your host. This is ideal for scenarios where you want occasional control over the VM, like during debugging or configuration.

Meanwhile, choose a client connection if you want to use your virtual machine as the client. In other words, the VM actively initiates the connection to a designated program upon startup. It’s common for logging applications where you automatically send data to another system.

Creating Serial Port Network Connections Without Authentication Parameters

To configure your VM with a serial port server connection with a telnet://:11111 URI (Uniform Resource Identifier), run the following command.

telnet yourESXiServerIPAddress 11111

Meanwhile, you can also set up your serial port using a client connection by running the Telnet Server on Linux on port 11 (telnet://yourLinuxBox:11). Use the following command.

telnet://yourLinuxBox:11

Accessing Serial Ports in a VMware Workstation

An easy way to access COM ports in a virtual machine is to use Serial to Ethernet Connector, a trusted serial port redirection engine. When used under a client connection, it unites the virtual interface with the host computer’s physical serial ports. This gives the virtual machine control over your attached devices.
1
To set it up, download and install Serial to Ethernet Connector on the PC sharing the serial port.
2
In the Serial to Ethernet Connector app, go to the “Server connection” tab and select the host computer’s COM port. Then, enter the TCP port to be used for digital communication monitoring.
3
Click the “Create server connection” button. Next, connect your serial port to your virtual machine via VMware (as discussed earlier).
4
Go to your guest operating system. Open the Serial to Ethernet Connector app and switch to the “Client connection” tab. Once there, enter the same TCP port details and specify the host computer’s IP address.
5
Name the serial interface of your virtual machine and click “Create client connection.”

Conclusion

Virtual serial ports are handy when it comes to debugging or logging purposes. They’re easy to add via VMware Workstation Pro, but accessing them inside the virtual environment is still done most easily with Serial to Ethernet Connector.

Frequently Asked Questions

If you’re using a physical serial port from an ESXi host to a VM, the serial ports that you connected via USB are unsupported for VMware serial port passthrough. Instead, you should opt for USB passthrough. See USB Configuration from an ESXi Host to a Virtual Machine.
VMware ESXi allows you to work with up to 32 serial ports. The serial ports on your motherboard can be easily redirected to a virtual machine from an ESXi host.
small logo Serial to Ethernet Connector
#1 at Serial Port Software
Serial to Ethernet Connector
Access remote serial port over IP Network
Get a download link for your desktop
Submit your email address to get a link for quick download on your desktop and get started!
or
Available for: Serial to Ethernet Connector is compatible with Windows, Linux OS and Windows Mobile.

SEC for Windows

SEC for Linux